I have
To make princess pinatas you'll need:
Balloons
Flour, water, salt
Newspaper
Tissue paper (the same color as the princess dress)
Computer, color printer, cardstock
Scissors, tape, white glue
String or yarn
Candy for each pinata
Mix up a batch of paper mache paste. There's lots of recipes, but I use a no-cook that's half flour and half water. I also throw in some salt because I've heard it helps prevent them from molding. To cover small six balloons I used one cup of flour and one cup of water for each layer.
 |
| Delicious |
After the second layer has dried, pop each balloon. If your paper mache is dry, the balloon should pull away from the sides and you can discard it. Fill each pinata with candy and/or confetti.
Once they're filled cover over the top with two layers (drying between each). You do not have to cover the entire pinata - just do two layers at the top so it's the same as the rest of the pinata.
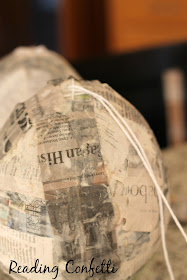
Tie string around the balloon so that the knot is where the opening used to be. Be sure to leave enough extra string to tie up your pinatas.
At this point you have to make a judgement call about whether your pinatas are strong enough. I stopped here because my balloons are small and in the past I've put so many layers on that the kids weren't able to break them open. If your pinatas still feel flimsy, continue to add layers of paper mache until they feel right.
 |
| My first attempt at pinata making. There were NINE layers. |
While you're waiting for everything to dry, cut tissue paper strips four inches high. Fold it in half the long way and then cut fringe into it. I doubled up on them to save time. (I only used 2-3 sheets of tissue paper for each princess, but it depends on the size of your balloons and how closely you glue the strips together.)
Using school glue, attach a circle of tissue paper to the bottom of the pinata.
Glue the fringe all the way around the pinata working from the bottom up.
Do a search for the princess image you want. Paste it into a Word document and resize. You'll only need the top half. Print and cut them out. I also laminated mine, but I don't think it's necessary. Tape them to the string on the pinata and you are done!
Thank you to The Copycat Crafter's DIY pinatas, Ruffled's pinata favors, and Erica's Sweet Tooth's Disney princess cupcakes for inspiring these.


We love these pinata's! We are going to make the Elsa one for my daughter's 4th birthday! Thanks for taking the time to post your ideas and a tutorial on how to make them!
ReplyDeleteThanks for taking the time to leave a comment, Michelle!
DeleteOh we love these! Making a large Belle one for my daughter Bella's birthday! She will be delighted and doesn't know yet!
ReplyDeleteThank you for your tutorial! Ill be making these as Sofia the First party favors! How long did the paper mache mixture take to dry?
ReplyDeleteWe let it dry overnight between each layer but a fan aimed at them will speed up the drying time.
DeleteLove this idea, thanks for tutorial, almost completed making rapunzel for daughters party, she is going to love it!
ReplyDeleteHi, thanks a lot. I have a question : what do you stick at the back of the princess's picture? The piñata is rotating on the rope. ... so they can see the piñata from different sides. .. Thanks again.
ReplyDeleteI didn't put anything on the back, so the back didn't look very nice. The kids didn't care, but you could try putting another princess on the other side with a piece of colored paper in between?
Delete